
And now my MIL can take a 32 oz. square Nalgene bottle with her wherever she goes! It just happened that this bottle was a perfect candidate for blocking the bag as it dried.
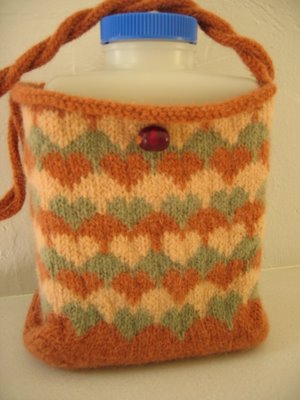
Someone had asked for the pattern, so here is what I did.
I really like the look of Sophie from Magknits. I started with that pattern, and made some modifications.
Yarn: coned wool, probably DK weight. MC = dark pink, A=light pink, B=seafoam green. I am guessing that I used about 100g of MC, 50g A, 50g B.
Needles: #6 and #8 Boyes Aluminum interchangeable circular
Notions: stitch markers, 3 stitch holders, and a button or bead for closure
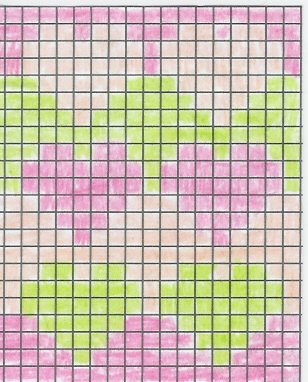
First, I mapped out the pattern I wanted. I knew I had 3 colors to work with, and I wanted hearts. I made this chart for the colorwork. The grid paper was easy, I just made an Excel spreadsheet and made the columns and rows equal, then printed it with gridlines to have a blank sheet to work with. My pattern will work with any chart that is an 8-stitch, 7-row repeat.
With a #8 needle, CO 39 stitches in MC, with yarn doubled for extra strength (note that you should use #6 needles here to have a clean, square bottom). K 28 rows in stockinette stitch.
Pick up and K 13 sts along the left edge of the rectangle just worked. Pick up and K 39 stitches along the CO edge. Pick up and K 13 sts along remaining side. (104 stitches)
pm. K 4 rows in MC.
K 42 rows in chart, beginning with the row that has color B (first MC row in my picture is superfluous).
K 4 rows in MC.
BO 46, place 6 on holder. BO 46, place 3 on dpn, remaining 3 on holder. Make an I-cord with the 3 stitches on the dpn until the cord is 20 inches long. Place stitches on holder. Make a second I-cord with the last 3 stitches until it is also 20 inches long. Twist the cords together and join with the 6 stitches on the opposite side using kitchener stitch.
Using crochet stitch, make a loop that will serve as the closure.
Felt and dry. Add the button or bead where the closure loop will reach and stay taut.
16 comments:
Looks great. I have yet to move into felting territory but I am keen to try a little project as I love the effect. Thanks for sharing the pattern!
Very neat! I'm impressed that you got an idea from head to FO so neatly and quickly!
You retained great definition there after felting--I'm impressed. I love that color combo as well.
Gorgeous bag!
Congrats - it looks great! I wish I had that kind of breakneck knitting speed. The colors look great and it really felted up nice.
So cute!
That's such a great design.
BRAVA!!
Gorgeous work there! And thank you for sharing!
Thank you for your comment about my sweater. That bag is great,nice colors, lucky mil. I'm currently working on jaywalker too, my first pair of socks.
Nice work there! Looks awesome! :)
This came out great. your mil must be thrilled!
Me, me! i asked for the pattern! Thank you very much, your wonkiness :) Finished item is beautiful.
Looks fantastic! Really nice job on that one!!!
That's a great bag! Yours is perfect for just about anyone. And if one were to knit it in pinks and whites with a bit of glitter, it would be more than perfect for pre-teen and teenage girls. Thanks for posting the chart!
ooh, I love the bag. You want my address to mail it? haha. jk. ;)
Very cute. I had something like this spooking around in my head lately. Thanks for the push to get me going.
Post a Comment